
Guide to Lithium-Ion Golf Cart Batteries
December 10, 2025
What to Do When Your Golf Cart Won’t Start — Tips & Fixes
December 16, 2025
The speed controller is a key part of a golf cart that regulates how power flows from the batteries to the motor. It controls how fast your cart goes, how smoothly it accelerates, and how well it performs overall. When the controller isn’t working right, your cart may act jerky, slow down, or stop moving altogether. Understanding how it works is the first step to spotting problems and fixing them.
In this article, we’ll explore golf cart speed controllers, how to spot potential issues, and how to make a repair that keeps your cart running smoothly.
Warning Signs of a Bad Speed Controller
When your speed controller is damaged or broken, there are a few key signs to watch out for. Noticing these warning signs early can help prevent further damage and ensure your golf cart runs safely:
- Inconsistent speed: Your cart may hesitate, surge suddenly, or fail to reach top speed.
- Unusual noises or smells: Buzzing, clicking, grinding, or burning smells may indicate failure or overheating.
- Loss of power: Slow acceleration and difficulty climbing hills may signal a bad controller.
- Error Codes: Advanced systems may display error messages to diagnose issues.
Can a Golf Cart Speed Controller be Repaired?
Minor issues with your speed controller, such as loose wiring, corroded connections, or faulty sensors, can often be fixed with basic speed controller troubleshooting. However, for more severe issues such as internal damage, overheating, or electrical failure, repair is usually not the answer, and replacing your controller may be the best solution.
How to Repair a Golf Cart Speed Controller?
If you’ve confirmed that your speed controller is causing issues and feel comfortable repairing it yourself, the following steps can help you fix the problem. If you don’t feel comfortable or if these steps don’t resolve your problem, it’s best to schedule a service appointment with a professional.
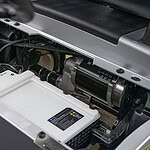
- Locate Your Speed Controller: In most golf carts, the speed controller is located in the battery compartment, near the motor, or under the seat. If you’re unsure of its placement, check your cart’s manual.
- Inspect Wiring Connections: Check the area around the controller for loose, corroded, or disconnected wires and gently tighten or clean them as needed.
- Check the Wiring harness: Look for damaged, frayed, or burned wires that could interrupt power flow to the controller. If you identify any damaged wires, carefully replace them or contact a professional.
- Reset the Speed Controller: Some golf carts allow you to reset the controller by following instructions found in the manual in order to resolve minor issues.
- Test Voltage with a Multimeter: Use a multimeter to measure the controller’s input and output voltage and compare it to the manufacturer’s expected ranges.
- Replace the Controller: If your inspection shows internal failure or incorrect output, replacing the speed controller is typically the most reliable fix.
How to Repair an E-Z-Go Speed Controller?
For E-Z-GO golf carts, there are specific steps to follow to check and repair the speed controller. Following these steps can help you identify issues and get your cart back on the course:
- Flip the Maintenance Switch: All E-Z-GO speed controllers are equipped with a maintenance switch that must be flipped before you repair the problem. You will likely find the switch under the seat of your golf cart, but if you’re having trouble locating it, consult your owner’s manual. Once you find the switch, flip it to tow-maintenance mode.
- Reset the Battery Cable: Unplug the negative battery cable (the black wire) before beginning any work on the speed controller. Once disconnected, you should remove the speed controller cover and then reconnect the negative cable.
- Check Your Connections: Inspect all the wires and ensure the connections are secure. Sometimes the problem can be as simple as loose wiring, and all you need to do is plug it in tight. Also, check for any breaks or corrosion in your wires that signify it may be time to replace them.
- Assess Voltage: You can check the voltage of the controller battery by connecting both the positive and negative probes to the battery.
- Test the Solenoid: In a golf cart, the solenoid is the electrical switch that allows power from the battery to travel to the starter. If there is an issue with your cart’s solenoid, some of the symptoms can be the same as a malfunctioning speed controller.
- To test your cart’s solenoid, you’ll want to take a reading of the voltage and compare it to the reading you got off your battery. Attach the positive probe to the solenoid post nearest the battery and get the reading. If the solenoid and battery readings are identical, there is an issue with the solenoid. However, if the reading isn’t at least 3 volts less than the battery, the problem is with the resistor, and it should be replaced.
- Check Your Controller’s Power Output: In order to determine power output, connect the negative probe to the M terminal and the positive probe to the B+ terminal. The reading should start at 0 and increase to the same level as the battery voltage as you press down on your accelerator.
- If the motor on your golf cart doesn’t turn, the problem is probably the directional switch/motor, but if there is no voltage at all on your reading, you’ll need to replace your speed controller.
Trust Garrett’s for Expert Golf Cart Maintenance and Repairs
At Garrett’s Golf Cars, we’re here to help keep your golf cart in top condition. From routine maintenance to expert repairs, our team ensures your cart runs smoothly and safely. If you’re in need of a speed controller repair or a replacement, stop by our Charleston or Greenville locations or contact us today.

